Friday, December 31, 2010

Italian Meringue - No Weeping!

Info:

Italian meringue is made with boiling sugar syrup, instead of caster sugar. This leads to a much more stable soft meringue which can be used in various pastries without collapsing. In an Italian meringue, a hot sugar syrup is whipped into softly whipped egg whites till stiff. This type of meringue is safe to use without cooking. It will not deflate for a long while and can be either used on pies and Baked Alaska, or spread on a sheet and baked for meringues.

http://en.wikipedia.org/wiki/Meringue

Ingredients

  • 1 cup superfine sugar
  • 1/3 cup water
  • 5 egg whites, at room temperature
  • 1/4 teaspoon cream of tartar

Directions

In a small pot over low heat, combine sugar and water. Swirl the pot over the burner to dissolve the sugar completely. Do not stir. Increase the heat and boil to soft-ball stage (235 to 240 degrees). Use a candy thermometer for accuracy. Wash down the inside wall of the pot with a wet pastry brush. This will help prevent sugar crystals from forming around the sides, falling in and causing a chain reaction. Prepare your meringue.

In the bowl of an electric mixer, whip the eggs whites on low speed until foamy. Add the cream of tartar, increase the speed to medium, and beat until soft peaks form.

With the mixer running, pour the hot sugar syrup in a thin stream over fluffed egg whites. Beat until the egg whites are stiff and glossy. Spread the meringue over a hot cake or pie, and bake as directed.

For Meringue Cloud Cookies: Preheat oven to 200 degrees F. Line baking sheets with parchment paper. Dollop spoonfuls of meringue onto baking pans, alternatively you may use a pastry bag with a star tip. Bake for 2 hours until crisp. Turn off the oven and allow meringues to cool and completely dry out.

http://www.foodnetwork.com/recipes/tyler-florence/italian-meringue-recipe/index.html

No Weep Merigne

Never Fail Meringue
This makes a tender meringue, and it will not weep!

2 teaspoons cornstarch
2 tablespoons cold water
1/2 cup boiling water
3 egg whites
6 tablespoons granulated sugar
1/8 teaspoon salt
1/2 teaspoon vanilla extract

Mix cornstarch and water. Stir into boiling water. Cook until thick and clear. Let cool completely.

Beat egg whites; gradually beat in sugar, salt and vanilla extract. Beat into cooled, cooked mixture; continue beating until mixture stands in peaks. Spread on pie. Brown in preheated 375 degree F oven.

http://www.theingredientstore.com/joesplace/swap1.pl?noframes;read=7270

Thursday, December 23, 2010

Turkey Brine

http://www.the-perfect-turkey.com/turkey-brining-recipe.html

2 gallons (256 oz) water
1 cup Diamond Crystal kosher salt*
1/2 cup brown sugar
4 bay leaves
1 Tablespoon peppercorns
1 bunch sage
1 bunch thyme

Chips - Salt Flavor

the older i get, the more i feel that the plain old Salt Flavored ones are the best
  • when younger, bbq was my fave!
  • then i moved onto funyuns and started to like the complex adult flavors of sour cream and onion
  • now, i find myself most interested in salt only or if available, salt and pepper
  • sounds like i am either turning white or old

Wednesday, December 22, 2010

Eggs in Bread

Eggs

Whole eggs are about 75% water, so, as with milk, bakers must be careful not to
simply substitute one for the other. Whole eggs are net tougheners, which means
that, although the yolk contains fat, enough proteins are present in eggs to more than
compensate for any tenderizing effects in the yolk.

ADD STRENGTH

Whole eggs typically are included in a bread formula to add strength to dough,
together with a bit of color and flavor. If strength is all you want, then egg whites
may be added alone, or you can use separated egg yolks to add richness and color
to the bread crumb. Whole eggs and egg yolks are also useful in another way—as
emulsifiers. Lecithin is a natural emulsifier in egg yolks that holds added fat in suspension
with the moisture in dough. This is especially important in high-fat breads
like brioche.

(from "Bread Baking: an artisan's perspective")

Tuesday, December 21, 2010

Tangzhong Starter Reasoning

  • weakens the gluten structure in the flour
  • same reasoning as roux as the longer it cooks, the less thickening power it has, which means its gluten strength is weakened...
  • so if i want to really weaken the gluten power of flour, i should add more water and cook longer...
  • as the soft chinese bread usually asks for pastry flour which has less gluten, this roux idea totally makes sense...
  • i wonder if 1 or 2 minutes on the stovetop is enough to weaken it.

Sub Cake Flour with A/P Flour + Corn Starch

To substitute cake flour for all-purpose flour use 1 cup plus 2 tablespoons cake flour for every cup of all-purpose flour. Make your own - one cup sifted cake flour can be substituted with 3/4 cup (84 grams) sifted bleached all-purpose flour plus 2 tablespoons (15 grams) cornstarch.

A/P Flour - 84 grams (3/4 cup)
Corn Starch - 15 grams (2 tbsp)

Read more: http://www.joyofbaking.com/flour.html#ixzz18mYpllq7

Flour Weight

All-Purpose Flour:

1 cup = 140 grams

1 cup sifted = 115 grams

Cake Flour:

1 cup = 130 grams

1 cup sifted = 100 grams

Whole Wheat Flour:

1 cup = 150 grams

1 cup sifted = 130 grams

Bread Flour:

1 cup = 160 grams

1 cup sifted = 130 grams


Read more: http://www.joyofbaking.com/flour.html#ixzz18mYdBikU

How to Make Your Own Cake Flour

Cake flour is something most of us don't keep around because - well - we use boxed mixes! Besides cake flour is pretty expensive. Did you know it's actually pretty easy to make a substitute that works really well? Here is the recipe - quick and easy!

Difficulty: Easy

Instructions

Things You'll Need:

  • 1 3/4 cups Flour
  • 1/4 cup Cornstarch
  1. Mix the flour and cornstarch together, using light whisking movements with a fork or whisk. That's all you really need to do.
  2. You could simply substitute all purpose flour for cake flour by taking two tablespoons of regular flour from each cup of all purpose flour. The reason for adding cornstarch instead of just using less flour is to lower the gluten content in the flour to make it lighter and to reduce the chance of your baked goods becoming tough.

  3. Flour that is produced as cake flour is actually bleached to make it white and to break down the protein that produces gluten in the flour. It's also higher in starch, so adding the cornstarch is exactly what all-purpose flour needs to work as cake flour. The finer texture of cake flour is produced by longer milling so you can run the flour/cornstarch mixture in a food processor if you want that finer texture.

Read more: How to Make Your Own Cake Flour | eHow.com http://www.ehow.com/how_4532763_own-cake-flour.html#ixzz18mYBRV00

Tuesday, December 14, 2010

Keys to Prime Rib

  • let the rib stand outside overnight to make the inside more to room temp. several hours is not enough, not even 4....in the summer ok, but in the winter, useless
  • most important is that it gets enough time to rest, more so than the meat staying hot...leave lots of time for the meat to be done prior
  • took about 15 minutes to rise 1 degree
  • after 6 hours at 200 degrees, my meat was only at 90 degrees
  • low and slow is the best method...meat was tender and no outer ring of dark
  • torch is great
  • score the skin to make it not shrink
  • no need to cut off bone from meat prior...it is very easy to do later if i cut the huge cooked prime rib in half and use a boning knife
  • salt the meat up to 24 hrs in advance or else the salt does not penetrate the skin...
  • salting it lightly after the meat comes out of the oven might give that nice crunch that i love in steak.

Key to Ratatouille

  • piperade should be more dry
  • cover tightly with foil when baking to keep veggies moist and tops not dry out
  • parchment allows air to get in and dries the top of veggies
  • add several holes in foil after halfway cooked and fully off when reheating it should be enough to reduce the liquid
  • much new liquid comes from the layered veggies, so we can let the tomato piperade reduce a lot more than i expect.
  • very little salt...it gets reduced down anyway.
  • 350 to reduce with foil off is fine..takes about 20 min to get a lil dried on top and reduced.275 as the instructions say seems to be too long
  • think i prefer just to poke holes after 1st hour of baking at 275.

Steam Method for Bread

cast iron pan is best...but what if no room for the pan?
  • a foil pouch and several pieces of ice should be perfect and fit easily..
  • with the baking tile so hot and foil so thin, ice should make the condensation no problem

Thursday, November 25, 2010

About.com - Brine

The most basic process of brining is to take approximately 1 cup of table salt (no iodine or other additives) to 1 gallon of water. Another way to measure this concentration is with a raw egg. The ideal brine has enough salt to float a raw egg. You will need enough brine to completely submerge the meat without any part being out of the liquid. Some items might need to be weighed down to stay under. Brine meat for about a hour per pound. Remove from brine (don't reuse the brine), inse to remove any excess salt and cook.

http://bbq.about.com/cs/barbecuetips/a/aa112000b.htm

Tuesday, November 23, 2010

Cooking TweetTip - Mashed Potatoes

#cooking #tip - Mashed potatoes - Use only enough water to cover potatoes and boil with a cheesecloth sachet of the skins for max flavor.

Food Myth - Slow Roasting Turkey is Unsafe

The USDA says “(When roasting turkey), Set your oven temperature no lower than 325 °F.”

A food study (http://www.hi-tm.com/Documents/Turkey.pdf) did a study and proved that slow roasting turkey is COMPLETELY SAFE as bacteria in turkey is killed at temperatures above 130.

Tip on Slow Roasting Turkey: Roast at 275 until internal temperature of 170 thigh and 160 breast (breast side down halfway). Cool down for 1 hour tented. Roast breast side up at 500 for 10 minutes to brown the skin.

Friday, November 5, 2010

Article - Turkey Tips

http://www.huffingtonpost.com/craig-goldwyn/smoked-thanksgiving-turkey-recipe-technique_b_778299.html

7) When the internal temp of the breast passes 160°F, drain the cavity into the gravy. Many cookbooks say you should take it up to 170°F or 180°F, but that temp is guaranteed to produce meat as dry as cardboard. If the temp is 160°F in the center of the breast with an accurate digital thermometer when you take it off, it will rise another 5°F if you let it rest about 15 minutes. At 165°F in the breast it is safe according to the United States Department of Agriculture (USDA). At that temp, the thighs are likely to be at 170°F or higher. They can handle it because they are juicier and slightly more fatty. Don't worry if it is slightly pink. Smoke can turn meat pink and, according to USDA, slight pink is OK (see the sidebar above).

Monday, November 1, 2010

Vietnamese Basic - Garlic, oil, fish sauce

from "gourmet's diary of a foodie - india and vietnam"

good starter sauce for stirfry, soup, anything

  1. oil
  2. a. (optional chilies)
  3. minced garlic
  4. cook 30 sec til fragrant
  5. half cup fish sauce
  6. reduce to half and start stirfry with meats, veggie, etc...

Friday, October 29, 2010

Tips on Choosing Fish

Scene on "foodie's diary - seattle"

  • slimy, aspic on top of fish = freshness
  • scales - want to feel it..if can't feel it, fish was thrown around and mishandled after it was caught
  • halibut - green hue is good
  • ling cod - BAD - inside flesh is reddish - means the fish struggled at death therefore blood taste in the flesh
  • long cod - GOOD - inside is white and no red in the flesh - no struggle, clean taste

Sunday, October 24, 2010

Bread Lessons

after baking bread every 3 days for the past month, i have learned a few things:

  1. to get bigger holes in the bread, don't fully degas it when u punch down the dough after the benchproofing
  2. to get a thick crispy crust, u need to pull and stretch the dough when shaping
  3. if all u do is shape it without stretching dough over itself when making the baton shape for baguette, the baguette might have bigger holes and still taste fine, but its crust will be soft
  4. baking with tiles on the 2nd notch up from the oven bottom is best...any lower and the bottom burns
  5. don't spray tops of the bread too much when it first goes in the oven....it makes the crust unable to get crisphy
  6. when slashing for the baguette ears, a serrated blade is better than any utility blade or kitchen knife
  7. slashing strokes need to be fast and deep
  8. not deep enough and the slashes fill fill up
  9. baguette slashes need to come from a near horizontal angle. if its vertical, the bread will just open up, not fold ears
  10. best to let the shaped baguette dough rise on a cylinder (i made my own using poster cardboard tubes) lined with a floured lint-free towel
  11. when sliding the dough from the towel to the floured board (to help with putting dough into the oven), just roll it off into it
  12. breads need to be rotated after the initial 10-15 minutes
  13. breads are easiest to shape when there is no flour around and the table is slightly wet so the dough sticks slightly to it.
  14. breads need lots of time to rise after shaping or else it won't get enough oven spring to give it a nice shape

Sunday, September 5, 2010

9/5 - hand kneaded pullman

9/5 - used the regular pullman recipe from "bread" book...half recipe with covered top, pullman style...used bread flour...no AP

  • great looking crumb
  • better webbing than when machine mixed
  • softer than prior
  • not as crusty...softer type of bread

9/7 - from the taste and color of it when toasted, i need to boost up the sugar lots and salt a little...salt to knock out yeast after aroma and sugar to get it browning in the toaster and to give it more flavor....

love how it stayed so soft

Hand Kneading Bread

1st time kneading bread with hands in a long time...weird findings
  1. did autolypse with flour and water in bowl...did not knead...looked very dry...really tempted to add some water
  2. then added all other ingredients in bowl...still felt dry
  3. flipped everything onto table and started kneading...felt very dry
  4. then started to get very wet feeling...was tough to knead as it all stuck to my hand and table...before, i would have added more flour...i was very tempted to do the same today but decided to just keep kneading as i heard its normal for it to feel wet and later get better...
  5. then after 3 min of kneading, it turned tacky, no longer yet....nothing stuck to fingers or table...amazing! was perfect
  6. kneaded 5-7 min more and found baker's window...stopped and let it rest and rise in bowl with some oil
  7. let it rise double
  8. punch down and roll into the pan and cover
  9. rise and bake 400 degrees for 30min

bread turned out way better than machine mixed!...holes better and so was the texture...liked it a lot! maybe best bread in a long time...quicker too...

Thursday, August 19, 2010

Meat Doneness Chart

http://whatscookingamerica.net/Information/MeatTemperatureChart.htm


Beef and Lamb Cooking Temperature Chart

Roasts, Steaks & Chops


Rare

120 to 125 degrees F

center is bright red, pinkish toward the exterior portion

Medium Rare

130 to 135 degrees F

center is very pink, slightly brown toward the exterior portion

Medium

140 to 145 degrees F

center is light pink, outer portion is brown

Medium Well

150 to 155 degrees F

not pink

Well Done

160 degrees F and above

steak is uniformly brown throughout

Ground Meat

160 to 165 degrees F

no longer pink but uniformly brown throughout


Poultry Cooking Temperature Chart


Poultry (Chicken & Duck)


165 degrees F


cook until juices run clear


Turkey
NOTE: A 12-lb turkey can easily handle 60 to 90 minutes of resting. During that time, temperature can rise 30 degrees if not exposed to drafts.

165 degrees F

juices run clear - leg moves easily


Stuffing (cooked alone or in turkey)

165 degrees F


Pork Cooking Temperature Chart

Roasts, Steaks & Chops


Medium

140 to 145 degrees F

pale pink center

Well Done

160 degrees F and above

steak is uniformly brown throughout


Pork ribs, pork shoulders, and beef brisket

160 degrees F and above

medium to well done


Sausage (raw)

160 degrees F

no longer pink


Ham


Raw

160 degrees F


Pre-cooked

140 degrees F


Fish and Seafood Cooking Temperature Chart

Fish (steaks, filleted or whole)

140 degrees F

flesh is opaque, flakes easily


Tuna, Swordfish, & Marlin

125 degrees F

cook until medium-rare (do not overcook or the meat will become dry and lose its flavor


Shrimp


Medium-size, boiling

3 to 4 minutes

cook until medium-rare (do not overcook or the meat will become dry and lose its flavor

Large-size, boiling

5 to 7 minues

cook until medium-rare (do not overcook or the meat will become dry and lose its flavor

Jumbo-size, boiling

7 to 8 minutes

cook until medium-rare (do not overcook or the meat will become dry and lose its flavor


Lobster


Boiled, whole - 1 lb.

12 to 15 minutes

meat turns red and opaque in center when cut

Broiled, whole - 1 1/2 lbs.

3 to 4 minutes

meat turns red and opaque in center when cut

Steamed, whole - 1 1/2 lbs.

15 to 20 minutes

meat turns red and opaque in center when cut

Baked, tails - each

15 minutes

meat turns red and opaque in center when cut

Broiled, tails - each

9 to 10 minutes

meat turns red and opaque in center when cut


Scallops


Bake

12 to 15 minutes

milky white or opaque, and firm

Broil


milky white or opaque, and firm


Clams, Mussels & Oysters


point at which their shells open - throw away any that do not open

Chicken Doneness

thttp://www.recipetips.com/kitchen-tips/t--329/chicken-checking-doneness.asp

Chicken - Checking Doneness

Checking doneness is accomplished in basically the same manner regardless of the cooking method you are using. Some methods are more accurate than others and some are more suitable in regard to the cooking method and to the cut of chicken. Shown below are the most common methods for checking doneness.

Thermometer: Using a thermometer is the most accurate method for testing doneness of the chicken. A regular meat thermometer or an instant read thermometer can be used. A regular meat thermometer is inserted before placing the chicken in the oven or other heat source and remains there throughout the cooking time.


An instant read thermometer is used to check doneness once the chicken is cooked. The chicken is taken away from the heat source and the instant read thermometer is immediately inserted into the thickest part of the breast or thigh (it should not be touching a bone). The thermometer provides a temperature reading in approximately 15 seconds.

Internal Temperatures for Proper Doneness
Whole Chicken - Thigh Area 175° - 180°F
Whole Chicken - Breast Area 170° - 175°F
Chicken Breast and Wings 170° - 175°F
Chicken Parts - Dark Meat 180°F
Ground Chicken 170°F
Stuffing Inside Whole Chicken 165°F

Note: If the proper temperature is not reached, the chicken should be returned to the heat source for further cooking.


Piercing:
Another method for testing doneness is to prick the chicken with a fork or the tip of a knife and check to see if the juices that escape run clear. If the juices have any pinkish coloring, the chicken is not done and should be returned to the heat source for further cooking.

Visual: The visual method of determining doneness is to make a small slit with the tip of a knife into the thickest part of the chicken and then pry the slit open. The meat should be opaque with no signs of pink coloring. If the meat shows any signs of not being done, the chicken should be returned to the heat source for further cooking.


8/19 - Oven BBQ Bone- In Chicken Breast

ingredients:
  • 4 halved bone in chicken breast
  • s+p
  • spice rub
  • bbq sauce
  • ketchup
  • honey
  • liquid smoke
  • worchester sauce

steps:
  1. preheat oven 450
  2. sprinkle 3 finger pinch of kosher salt on each side of chicken breast
  3. season liberally with bbq spice rub
  4. place chicken on rack over foiled up sheet pan
  5. roast 15 minutes
  6. glaze with thinned out bbq sauce (bottled bbq sauce + hot water + ketchup + honey + liquid smoke + Worcester sauce)
  7. roast extra 15 minutes (after 6 minutes, was at 130 degrees for smallest piece
  8. perfectly done for the 2 small pieces
  9. added another 5 minutes for 2 other pieces
  10. all done except that one piece
  11. added another 5 minutes
  12. glaze a lil more after it comes out...and serve!

Tuesday, August 10, 2010

Trussing a Chicken (online tutorial videos)

2 videos...

http://www.howcast.com/videos/8690-How-To-Truss-a-Chicken

Roast Chicken


(based on The Foodie Handbook's Roast Chicken recipe page 62)

  • about 2.75 lb free range chicken (original recipe sis 3.25 lb bird and roast longer)
  • 3 tbsp soft butter
  • s+p
  • handful of italian oregano
  • 3 sprigs of rosemary
  • 4 heads of garlic (smashed)
  1. preheat oven 425 F
  2. sprinkle liberally with s+p inside and out
  3. separate skin on top of breasts from the meat
  4. stuff cavity with rosemary, garlic, and oregano
  5. rub butter all over the cavity
  6. grease lil more below on the sheetpan
  7. truss up the chicken's legs and wings
  8. lie it on one of the thighs
  9. roast 30 minutes
  10. baste and flip it to the other thigh to rest on
  11. roast 25 more minutes...
  12. done! (i took out prior to timer because meat pulled away from leg a lot..checked temp and was 170 at thigh and breast)
  13. rest it with its tail up and breast down...let the dresses go into the breasts
grade B+

- needed slightly more salt
- ideally, more color on the breast...
- because the bird is so small, i needed to lower times before flip and leave some time to roast the breast
- just barely cooked through...see lil pink in the joint after cut into the thigh (originally thought not cooked enough..but i was wrong)
- breast quite moist but tough to say because it was freerange and very small breasts
- slight crispy..want it more crispy
- great flavor because of butter

next time:
- get a bird about 3.25 lbs
- roast as directions say...1/2 hour on a side, then 1/2 hour after flip, then 20 minutes for the breast and lower temp to 375 if not fully cooked and cook til juices run clear
- try to maybe roast one flip with the breasts down to leave breasts less exposed
- using an onion to stuff it more so heat doesn't go in would work better than just herbs where i can see the cavity open...
- learn to truss a bird properly

ideas:
- i like this idea of roasting on tights then keep flipping
- i also like the trussing as i believe it will allow for less heat to hit the breasts
- still feel that breasts will overcook esp if last minutes is to roast the breasts...
- i think best to roast first 20 min on one thigh, 20 min on other thigh, 20 min on the breast, and 20 minutes on the back....better than so much time with breasts exposed i think...

Monday, July 26, 2010

Pullman Bread (for Rino)


Ingredients: (450 g bread flour) - same as "http://simoncooks.blogspot.com/2010/07/pullman-bread-for-leslie.html"
  • 60% water - 270 grams
  • 5% butter - 23 g
  • 5% milk powder - 23 g
  • 100% bread flour - 450 g
  • 2.5% sugar - 12 g
  • 2.5 % yeast - 12 g
  • 1.8% kosher salt - 8g
Steps:
  1. mix only flour and water...leave 1 hour for autolypse
  2. mix everything together and mix on "sweet" fully
  3. put into fridge overnight
  4. fold once in morning
  5. leave out atleast 4 hours before mix again
  6. mix "sweet" fully
  7. roll up into 1 long roll and proof covered...
  8. when up the sides of bottom pan, preheat oven to 400 F
  9. cover pan and make 40 minutes...should be 200 F
  10. done!
Grade: B+

- best pullman bread thus far
- strong yeast smell at first whiff when eating and smelling it when eating within 30 min of it being taken out of oven
- very nice crust
- great texture with better gluten web
- flavor was good...much better than leslie's
- never got to try it the day after...
- top cracked a bit...needed to give it a better roll before shaping...

next time:
- mix and knead dough by hand next time...think its the only way to get the gluten i want
- only do autolypse for pullman or white bread...or else flavor is yeasty...
- try to do it without the covered top...think it will give a more caramel flavor to the bread...
- do a better job at rolling the dough before put into pan so it has a very nice top

Sunday, July 25, 2010

Website: very good bread info

http://www.thefreshloaf.com/lessons/tentips_8_autolyse

Friday, July 23, 2010

Pullman Bread (for Leslie)

(recipe from "bread" by hamelman"...half recipe)


Ingredients: (450 g bread flour)
  • 60% water - 270 grams
  • 5% butter - 23 g
  • 5% milk powder - 23 g
  • 100% bread flour - 450 g
  • 2.5% sugar - 12 g
  • 2.5 % yeast - 12 g
  • 1.8% kosher salt - 8g
Steps:
  1. mix for 5 minutes in machine on "sweet", then leave overnight in fridge
  2. take out 4 hours before remix with bread machine
  3. mix fully on "sweet"
  4. roll out into 2 big balls
  5. put into pan and proof covered with another pan
  6. when proofed til near top of bottom pan, tie up the pans and preheat oven 400 degrees
  7. bake 40 minutes
  8. done!
Grade: B-

- has a slight yeast flavor
- not much flavor
- gluten better so better texture but still not enough
- still slightly dry if not eaten asap
- looks better than it tasted
- covered was great idea...held its shape...perfect size
- crisp edges...very tasty when hot...

next time:
- better to let the bread fully rise once before put into fridge...(because no real rise in refrigerator, gluten not allowed to mature...similar to just fresh mix and baked bread)
- autolypse can be better idea so that we don't get yeasty taste and smell
- add more sugar and salt to the recipe

Sunday, July 4, 2010

What Eggs Do in Yeast Bread

http://www.ehow.com/how-does_5471387_eggs-do-yeast-bread.html

What Eggs Do in Yeast Bread

ds_athena11099 Contributor
By Athena Hessong, eHow Contributing Writer
(2 Ratings)
What Eggs Do in Yeast Bread
Klaus Höpfner/wikicommons.org, Paul Goyette/wikicommons.org, public domain/wikicommons.org, Athena Hessong

    Egg Yolks

  1. Egg yolks act as emulsifiers
    Egg yolks act as emulsifiers
    Egg yolks are the fat in the egg and act as a bridge between other ingredients in bread, allowing other fats to combine with moisture. Fats can be natural fat in the flour or added in the form of oil, shortening or butter. Without this emulsifying action, the yeast breads dry out very quickly because the moisture in them has not been linked to the fats baked in the bread.

    Egg yolks combined with fat in a yeast bread tenderize the protein present in wheat flour. This protein forms gluten during kneading, which makes the bread chewy. Reducing the amount of gluten formed creates a softer, more tender bread. When the yolks bind to the protein in the flour, they prevent water from combining with it to form gluten. The result, less gluten, and a more tender loaf of bread. Many yeast breads with egg yolks added also have sugar to further soften the texture, producing a cake-like concoction. Examples of egg breads include brioche and challah.
  2. Egg Whites

  3. Egg whites help the bread to rise, dry and stay together
    Egg whites help the bread to rise, dry and stay together
    Egg whites do not have the emulsifying power of yolks. Instead, egg whites dry bread out to create a crisper texture. This occurs when the proteins in the egg whites cook as the bread bakes. Each protein, when raw, resembles a single spring. Mixing the bread dough unravels these springs, but when the bread bakes in the oven, the springs become entangled with each other. Between these entangled proteins, water hides, but as the bread keeps baking, the proteins tangle even tighter, and the water is pushed out and into the oven as steam. This loss of moisture dries out the bread.

    Egg whites also act to help leaven the bread, especially if they have air whipped into them before adding them to the bread dough. The protein structure of egg whites traps air bubbles in it, and when they are mixed into the bread dough, those bubbles incorporate into the bread's structure. By helping the dough hold in more air, egg whites help the bread to rise.
  4. Whole Eggs

  5. Whole eggs contribute to the texture of yeast breads
    Whole eggs contribute to the texture of yeast breads
    With eggs, the whole is greater than the sum of its parts. Whole eggs, like whites, help to bind ingredients and assist in rising and drying, but they also add strength to the bread. Breads made with whole eggs perform best in recipes that require soaking the bread, such as stuffing, French toast and bread pudding. Without whole eggs, the bread would melt in the soaking liquid. Adding several whole eggs to a yeast bread opens the structure of the bread so that there are larger holes in the structure. These holes contain air, which helps to lift the bread.

Read more: What Eggs Do in Yeast Bread | eHow.com http://www.ehow.com/how-does_5471387_eggs-do-yeast-bread.html#ixzz0slsEEvDs

Thursday, June 10, 2010

6/10 - The Best Dinner Rolls!

Brushed with Butter + Honey mixture after proofed...minutes before popping into the oven


Fresh out of the oven


Sweet caramelized tops


insides nice and moist and airy...outside gives a nice bite


Ingredients:

  • warm water - 278 g (64%)
  • butter - 22 g (5%)
  • ap flour (sifted)* - 434 g (100%)
  • milk powder - 22 g (5%)
  • sugar - 35 g (8%)
  • salt - 8 g - 1.8%
  • yeast - 9 g (2%)
for butter honey (optional)
  • melted butter - 2 tbsp
  • honey - 1.5 tbsp
Steps:

  1. pop butter into mixing bowl
  2. pour hot / warm water on the butter and allow it to soften
  3. sift flour + mix all other dry ingredients in order into the mixer
  4. set bread machine to "sweet" bread dough...
  5. walk away for 1 hr 35 min
  6. take out dough from machine onto tabletop
  7. cut dough into 16 equal pieces
  8. roll into balls and place in a 4x4 shape in a stainless steel baking pan
  9. proof for 45 minutes
  10. preheat oven 375 degrees
  11. melt butter and stir with honey in a small bowl
  12. use a brush and liberally brush entire tops of the bread incuding the intersections between doughballs (this allows for entire top to brown when it expands in the oven)
  13. place into the middle of the oven and set timer to 20 minutes
  14. after 10 minutes, rotate tray 180 degrees
  15. when timer goes off, turn down oven to 340 degrees (tops of bread should be golden brown now but edges still light
  16. microwave honey butter mixture for 20 sec and brush entire bread tops again
  17. place into oven and set timer for 10 minutes
  18. take out of the oven and remove immediately from pan onto a wire rack to cool completely...
  19. allow 30minute to cool, then dig in
* sifting flour allows for lighter bread...tried it before without sifting and much denser...i didn't beleive it myself
** used double fiber Eagle Mills All Natural All Purpose Unbleached Flour from costco

Result:
  • The best damn dinner rolls in the world!
  • love the texture...very similar to pain de mie texture which has more of a bite than boring old store bought dinner rolls...
  • the honey tops are very nice and just to the point of caramelisation but not burnt and bitter...
  • ate one after it was cooled and it was slightly dry...so maybe increase moisture next time
  • love the color and shine of the rolls

mistake: i did not cool it on a rack but instead left it in the baking pan and bottom got lil soggy because of the honey mixture

Next time: try to bake at 350 degree oven for 30 minutes therefore don't need to turn down oven midway...maybe the tops won't be as browned though...slightly dry if i had to be superpicky, therefore try adding slightly more water to the mix

Friday, May 28, 2010

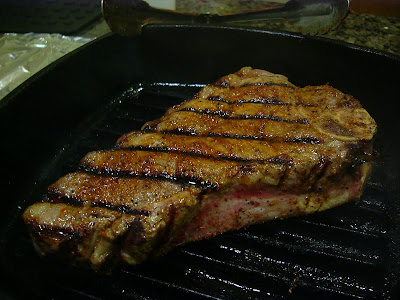
5/28 - Home Grilled BBQ NY Steaks

Bone-in New York Steak from Safeway (about 1 inch thick)...on sale!!


salted + seasoned steak...left out about 1 hr on table


sear the fatty edges, then the bone first


get a good sear on one side, and flip


after a few more flips, we are done!


Steps:
  1. take steak out of refrigerator about 1 hr prior to cooking
  2. season with about 1tsp salt
  3. season with all over liberally with 1-2 tbsp of bbq spice mixture (homeblend of paprika, brown sugar, chili powder, garlic powder, black pepper, salt, cumin, and onion powder...about equal parts each)
  4. when 1 hour is up and steak no longer super cold, pat down steaks to remove moisture on meat
  5. heat up cast iron grill pan...leave on medium high heat
  6. sear fatty edge for 1 minute, then sear other fatty side 1 minute...run the sides all along the pan to grease it up
  7. Sear bone side for 1 minute
  8. Sear presentation side of steak for 2 minutes
  9. flip and sear other side for 2 minutes
  10. sear bone side again for 1 minute
  11. flip and rotate to give presentation side the criss cross marks and cover with a pan (turn down heat to medium if needed)...cook leave for 2 minutes
  12. flip and rotate again and cover for 2 more minutes
  13. check temp...should be about 125-130 at about this point
  14. rest 5 minutes on a heated place and loosely cover with foil
Result:
  • super tender all around (meat was only select grade at best...no marbling at all...)
  • all around medium rare even near the bone
  • crisp thick crust...nice and caramelized because of sugar
  • when cutting, not much juice or blood came out...resting really helped
  • beautiful color